In today’s post I’m describing about how to setup calabash-ios to automate your functional end-to-end test for iOS applications. In my previous post I described about how to setup the Greenhouse application.If you are interested in how to automate an Android app, checkout this blogpost.
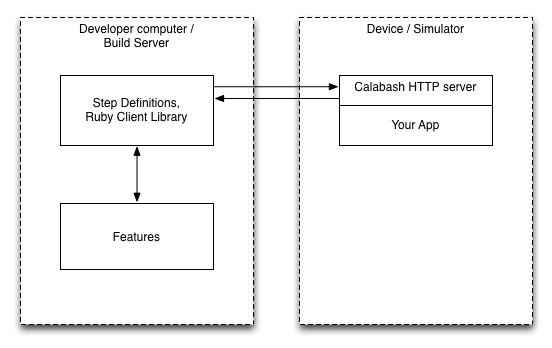
For using Calabash-ios, you need to have access to the app source code. The XCode project must modified, which means in detail, that a http server is added through linking with the the calabash.framework. The Calabash client library is sending HTTP requests to this server which is executing those commands.
To get startet github contains a very detailed description, about howto setup calabash-ios in general.
Currently there are two ways about how the setup can be done:
- Automated: using the command calabash-ios setup
- Manual: detailed steps are described on the wiki
I made good experience using the automated setup, but if you identify weird things in your app during test execution, I recommend to do a manual setup. For the Greenhouse iOS app I have used the manual setup, because I have seen some weird behavior.
In the first screencast I’m showing you, about how to do the automated calabash setup with the provided script:
In the second screencast, I describe all the detailed steps that needs to be done for manual the setup:
The the new target has been added to the app, you can verify in the logs that after starting the app the http server on the port 37265 is bound to. The default feature folder can be created with running the command calabash-ios gen, that is containing the feature file and all the other Ruby related Cucumber classes.
The third screencast is showing the actual test execution:
Karl Krukow, the creator of Calabash-ios, has given at the CukeUp! 2012 a pretty nice presentation and live demo about advanced features (like gesture (touch) recording and how these events can be played back).